All posts by faboutreach

YOUR FRIENDLY NEIGHBOURHOOD MEGASTRUCTURE

YOUR FRIENDLY NEIGHBOURHOOD MEGASTRUCTURE

What do you think of when you hear the word ‘megastructures’?

That’s the key question we were asking ourselves during this month’s edition of Fablab Outreach held on the 2nd July 2016. (By ‘we’, I mean the interdisciplinary group of students from various departments that you can see in the photos at the very end.)

Megastructures aren’t a new concept for human beings. Since the earliest times, we’ve been building big. These are just some of the examples that were presented to us.The_Great_Wall_of_China_at_Jinshanling-edit

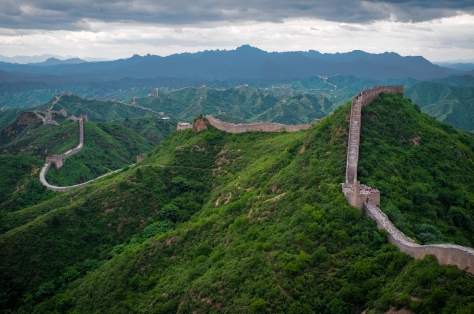
The Great Wall of China is a series of fortifications made of stone, brick, tamped earth, wood, and other materials, generally built along an east-to-west line across the historical northern borders of China to protect the Chinese states and empires against the raids and invasions of the various nomadic groups. It is over 21,000km long and can be seen from space.

Taj_Mahal-10_(cropped)

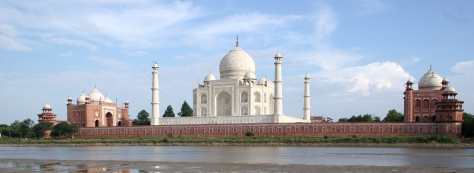
The Taj Mahal  (Persian for Crown of Palaces) is an ivory-white marble mausoleum on the south bank of the Yamuna river in the Indian city of Agra. It was commissioned in 1632 by the Mughal emperor, Shah Jahan to house the tomb of his favorite wife, Mumtaz Mahal. The tomb is the centrepiece of a 42-acre complex, which includes a mosque and a guest house. Its cost, were it being built today, would be over 800 million dollars.

OLYMPUS DIGITAL CAMERA

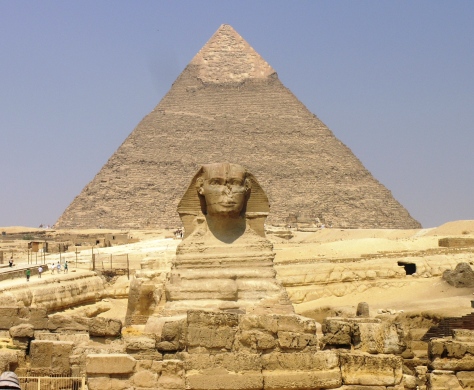
The Great Pyramid at Giza, suspected to be the tomb of the Eqyptian Pharaoh Khufu. On the Giza Plateau, Khufu’s builders oriented his pyramid almost perfectly north. The largest pyramid ever built, it incorporates about 2.3 million stone blocks, weighing an average of 2.5 to 15 tons each. It is estimated that the workers would have had to set a block every two and a half minutes.

Here are a few others that we looked at:

Coliseum-Rome-6.jpg

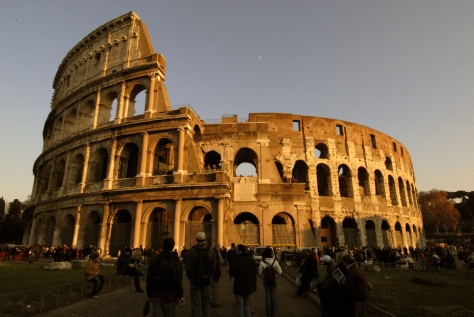
The Roman Coliseum, where so many died to please the crowds of the empire.

By looking at these ancient wonders of the world, you can spot a few of the characteristics of a true megastructure:

  1. Big
  2. Expensive
  3. Multidisciplinary

And we saw some of the reasons why they were built:

  1. Defence
  2. Love
  3. Prestige

There are also several modern megastructures, e.g.

green-101

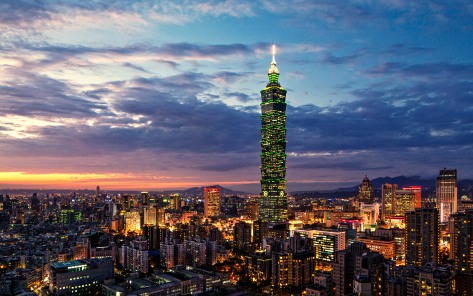
Taipei 101: was officially classified as the world’s tallest in 2004, and remained such until the completion of Burj Khalifa in Dubai in 2009. In 2011, the building was awarded the LEED platinum certification, the highest award according to the Leadership in Energy and Environmental Design (LEED) rating system, and became the tallest and largest green building in the world.

It was also a challenging structure to complete by virtue of being located in an area that is both a wind and earthquake zone. The challenge: to withstand an earthquake, a structure must be flexible to absorb the energy. To withstand high winds, it must be stiff. The solution:

Taipei_101_Tuned_Mass_Damper_2010

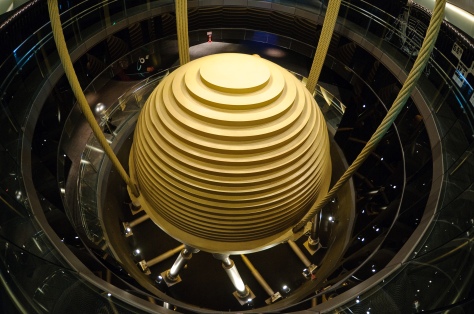
A 660-tonne (728-short-ton) steel pendulum that serves as a tuned mass damper, at a cost of NT$132 million (US$4 million). Suspended from the 92nd to the 87th floor, the pendulum sways to offset movements in the building caused by strong gusts. Its sphere, the largest damper sphere in the world, consists of 41 circular steel plates of varying diameters, each 125 mm (4.92 in) thick, welded together to form a 5.5 m (18 ft) diameter sphere.

airbus-a380-on-ramp

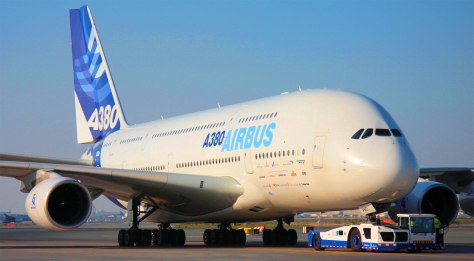
The Airbus A380: It is the world’s largest passenger airliner, and the airports at which it operates have upgraded facilities to accommodate it. It provides seating for 525 people in a typical three-class configuration or up to 853 people in an all-economy class configuration

cloud-servers

The Cloud: Cloud computing is a kind of Internet-based computing that provides shared processing resources and data to computers and other devices on demand. The size of cloud storage is measured in petabytes: 250 bytes; 1024 terabytes, or a million gigabytes.

What does this mean for us?

Every megastructure cited so far has been in some foreign country. Does this mean we as Africans have been asleep for all these years?

It was built with a tree and branches structure.

We are coming to the end of this part of the megastructures day. We’ve shown that megastructures:

  1. Were built in ancient times for love, as tombs, and for defence
  2. Come on all different shapes and sizes in the modern world
  3. Are found even in Kenya

But are they any good? Is there any engineering problem that only a megastructure can solve? Especially for a continent like Africa, where poverty is everywhere and large infrastructure projects are oftentimes used to embezzle funds.

Check out this video of Ethiopian Renaissance Dam, and make m=up your mind about the answers to these questions. https://www.youtube.com/watch?v=xzJixYFZl2o

  1. What are some engineering challenges that Kenya faces that can only be solved by thinking big?
  2. What are some possible solutions?
  3. What would be needed to implement these solutions?

That’s for us, as Africans, to ask ourselves.

And now to the photos of the event itself. Enjoy.


Guess Who’s Back!

“We can’t solve our problems with the same thinking we used when we created them.”-Albert Einstein (14 March 1879 – 18 April 1955)


The speaker of the day, a light-skinned, shaggy haired student aptly nicknamed Dexter, began with that quote. He was there in front of us to talk to us about that very thing: learning to think in a new way. The forum was by Fablab Outreach, a monthly student run programme under the University of Nairobi whose aim is to promote knowledge sharing among the youth, enable critical thinking, merge knowledge from various disciplines to form a common replicable open source sharing model and Oh, promote fun as well.

In front of him were a crowd of students from various courses at the university,. He was a student of electrical engineering. In the crowd were several of his classmates, quite a few students from the other engineering courses, and one or two others from other departments who felt most welcome. We were all gathered within the bowels of the Department of Mechanical Engineering, early on a Saturday morning when we really should all have been sleeping in. Why were we there?


Learning about large scale design thinking and world class design.


As dexter put it, at the heart of great engineering is design, and in order for the  attendees to have a baseline of judging a good design, a simple heuristic was given. Such a ”good” design should be:


  • cost effective
  • artistic
  • functional.


Dexter’s PowerPoint presentation showed us several feats of engineering from across the world that satisfied those criteria. I’ve listed some of the ones I found truly inspiring below. Every single one was not only a creative solution to a problem. It made people’s lives better in some real tangible way.

A wise man (but then again, he might have been very foolish) once said all learning starts off as confusion. I think we can all agree that Africa has lived through decades of what can only be described as confusion: unmaintained infrastructure, institutional breakdown, embezzlement of funds and a general focus on fancy buildings rather than what is truly beneficial for the common man. Let that period of confusion end with us.


I’d like to leave you with the thing that stuck out most for me. This is the Lujiazui  Circular Pedestrian Bridge.Picture3.jpg


It’s basically a roundabout for people. Cost-effective, artistic and very functional. Civil engineers in the house, can I get an amen?
See you all at the next session at the end of March. Specific dates shall be posted on their facebook and twitter accounts.


Some of my favourites…bridgesofchicago

There are eighteen of them, and all can be raised to let ships pass.


Picture1

…because beauty is also a human need.


Picture2

“Need a new foundation? Building’s already standing? No problem.”


Highlights from the Kidz Go Tech 2 program

We held  a Kidz Go Tech program, season 2, in collaboration with the Safaricom Women in Tech team and Funkidz. This six week program was themed Nairobi 2050 – a futuristic approach to developing interactive tech projects that incorporated the use of robotics, programming and automation. This program was carried out using the new Kidz Go Tech comic developed by the design team at Funkidz.

Here are images of the the great work the kids came up with in the course of this six week program:

This slideshow requires JavaScript.

Funkidz Tech Club Season 2


We’ve been hard at work for months now coming up with a curriculum for Kidz Go Tech Session 2.

Here are a few shots of us brain storming during our weekly Tuesday meetings at Safaricom.

Safaricom Meeting

After weeks of planning we finally came up with a experiments fit for the session. Here’s a look at our prototyping session.

Prototyping Session

Prototyping 2

Funkidz Tech Club Season 2 is starting on the 24th of August to the 28th of September. This will happen on the six consecutive Saturdays during that period. Our curriculum is based on our vision of Nairobi 2050, thus the theme “Nairobi 2050”. In the curriculum, we have six concepts, mainly: An introduction session, Lighting, Security, Transport, Funtomatics and Power Generation. Each concept has a set of three experiments that are able to get the children thinking about what really makes up a city. These experiments are based on engineering principles and technology in general to give a more real and futuristic feel.

What out for this space!

Kidz Go Tech Banner

Program

Tech Kidz Club Finale – Session 1(Week 6)

Some of the kids getting diving into the PicoCricket set
Marian taking some of the kids through the PicoCricket set

Today was the final session of the six week Fun Kidz Tech Club collaboration with FabLab outreach. As with all good things, we wanted to finish it off with a bang and that we did. The kids started streaming to Safaricom HQ 2 in from 9 a.m. and by 10 a.m, after a few games to get them energized, we separated them into five groups and started off with a brief recap of the PicoCricket and its components (above). With that out of the way, we dove right into today’s theme, an airport. Each group was given a part of the airport to recreate. These were an airplane, a watchtower, a runway, a metal detector, the main airport building and a security perimeter.

Some of the kids building the airport security system equipped with metal detectors

Here is the group of children tasked with making the metal detectors. They used a resistor to confirm the presence of metal, and once the metal was detected, they programmed the lights to turn from green to red and the sound box to sound an alarm. Below is a photo of the set-up with the grey wires connected to the resister used as the interface to test for metal resistance.

Here's a photo of the metal detector in all its glory
Here’s a photo of the metal detector in all its glory

Here’s a photo of the main airport structure.

Airport Structure
Airport Structure

Once the kids finished with their particular tasks, they went on a snack break. Shortly after, we were on to the next task, building a paper plane. We divided the kids into two groups with all the necessary materials. Below is Tony taking one of the groups through all the necessary steps.

The kids making their paper planes from scratch
The kids got a chance to customize their planes

As the kids played with their paper planes, some of the FabLab members got to showcase some of the projects they have outside of outreach. This was in the presence of Bob Collymore, Mugo Kibati and other guests. Roy Ombatti’s project is on leveraging 3-D printing technology in the fight against jiggers in Kenya. This involves manufacture of customized and medicated 3-D printed shoes as those ailing from the jigger menace have deformed feet and cannot wear regular shoes. Marian Muthui presented on behalf of her team on their project on transforming the interior cabin of an airplane using bamboo. the other members of the team are Alex Njira, Karl Heinz and Tony Mugita. the bamboo in their project will be specially designed so that a honeycomb structure of bamboo is sandwiched between laminated bamboo panels. Tony Mugita made a presentation on a mini-buggy project that is currently under development in industrial area.

Some of the FabLab members got to showcase other projects they're in
Some of the FabLab members got to showcase other projects they’re in

After the project presentations, the guests got a chance to see what the kids had been up to all day. Below we have Bob Collymore and Mugo Kibati getting responses from the kids on what their watchtower was made off and how it operates.

The kids explaining the parts involved in the construction of the watchtower

Satisfied with their answers, the kids gave a quick demonstration of the revolving radar receiver on the watchtower.

Some kids showing off their awesome watchtower

The next group in line was the one that worked on the runway. Here’s a look at the finished product.

The cool landscape
The cool landing strip

The kids talked briefly on the LED lights, batteries, cardboard, coloured tape and copper tape used in the construction of the landing strip.

The kids explaining what their landing strip is made off

Here’s Bob Collymore and Mugo Kibati listening keenly to the kids as the go through the steps they took in its construction.

Some of the kids showing off their cool landing strip

After a few parting words and a closing ceremony filled with cake and snacks, we ended the session on a high note. We can’t wait to for the next one:)

Some of the faces  that made this all possible
Some of the faces that made this all possible

Tech Kidz Club – 3-D Printing and Electronic Name Tag Assembly (Week 4)

With the 3D printer, we were able to print 3-D names for all the children with their help

Today, we spiced things up by incorporating one of the FabLab 3-D printer into our outreach schedule. By doing so, the children got a peek at the wonders that technology has to offer. With this machine, you can bring any 3-D miniature concept into reality.

The children enjoying a demonstration of the printer hard at work bringing a 3-D model cat to life
Jeremy, Alex and Meryie learning how to make designs that will then be 3D printed.
Harris, Rohan, Jeremy, Meryie and Alex hard at work
Neema and Rohan enjoying their turn on the 3-D printer
Allan and Alex showing their dad what they've been up to.
Allan and Alex showing their dad what they’ve been up to.
Rohan, Allan, Jeremy and Sean coming up with ideas for a new model.

Once the models were created, the children went into their usual groups and started off with scratch while the 3-D printer was hard at work. This week, the kids got down to understanding the Scratch program a little better.

Jeffrey helping Wangari out at her project
Jeffrey helping Wangari out at her Scratch project
Alex and Allan assisted by Val and Jill
Neema, Sean and Meryie assisted by Philip
Neema, Sean and Meryie being guided by Philip on their Scratch programming project
Samoire hard at work coming up with an advertisement on scratch while Michael takes Venessa through the basics

Before the children were able to present their projects, we all sat down and took a break.

Break Time. With some of the work behind us, we all sat down and chilled for a bit.

We had a brief warm-up session to get them into high gear for their presentations.

A little warm up before the presentations

They each presented their games and let the other kids take turns playing them. They joy they got from this is indescribable. With the 3-d printing done, the kids assembled into one group with manila paper, name tags, 3D printed names, copper tape, batteries and LED lights and all made their own customized name tags complete with flashing lights.

Tech Kidz Club – Scratch and Hover Craft Assembly (Week 3)

Introduction to Scratch made by Michelle, Shiku and Flora

Introduction to Scratch made by Michelle, Shiku and Flora for Rohan

This week’s session with the FunKidz Tech Club was on Scratch and a hover craft assembly. The session took place at the Safaricon Headquarters on Waiyaki Way.

We started off with a personalized introduction to Scratch based on the children’s ages.

Denis showing Alex the basics on Scratch

For some of the younger kids that couldn’t work on scratch, a different lego and pico cricket session was set up.

A Pico Cricket/Lego Block session for the younger kids
A Pico Cricket/Lego Block session for the younger kids. Allan learning ropes with his mum and Flora
Allan showing us how it's done
Allan showing us how it’s done

Once they learnt the basic, the quickly took over and started creating animations straight out of their imagination.

Allan and Rohan creating their scratch video
Jeremy and Carlton working on their scratch video with the help of Philip
Scratch Project
Wangari learning the ropes from Jeffery
Mweru and Joyce showing the girls how it's done
Mweru and Joyce showing the girls how it’s done
Scratch Projects
The kids are busy working on their scratch videos with the help of Philip and Lilian
Samoie working on his video with the help of Flora and Michael
Samoie working on his video

After the video animations were made, we split into two groups and started working with the Pico Crickets.

A short pico-cricket group session

This was followed with a short meal break to keep the energy levels up for some fun with science.

Mid session meal break

We got back to the Pico Cricket sets and the children continued making their individual projects which was anything from a car to houses.

Michelle going through the set with Alex, Allan and Rohan.
A group photo of the Pico Cricket Session

Once we got the Pico Cricket out of the way, we carried on with the Hover Craft assembly. All you need to make one of your own is:

  • Old CDs
  • Duct Tape
  • Plastic Bottles
  • Super Glue

The CD holes were covered up with the tape . This was done by the children. A couple of tiny holes were then put into the tape by the instructors. The bottle tops were cut off and super-glued to the tops by the instructors as well. Once dry, a balloon was held on to the bottle top, filled with air and laid on the table. The set up would then hover over the surface due to the gradual air flow out of the balloon.

Roy attaching the CDs to the bottle tops for the hover crafts

Tech Kidz Club – Science is Fun (Week 2)

On a bright sunny Saturday morning at Safaricom Hse – HQ II , Team awesome got down to business, setting up and what-not before the fun-kidz arrived

Image

Allen making final checks on the ‘equipment’ to make sure every is ship-shape…

Image

…the kids arrived, so eager to learn and have fun making miniature robots and automated cars.

Image

…getting accustomed to the Picocricket set

Image

…and before you know it, look what they made!

ImageRenato helping her team of young smart learner with their fun project …

Image

“…now this piece, goes here…and then…”

Image

…Michelle and the fun trio having fun learning about science, robotics and automation.

Image

Daisy and Joyce joining in on the fun as they help out the kids with the Picocricket kit

Image

….Snack-time!

Image

…Say “cheeesssee!”…oh look at those smiles 🙂

Image

…back to some more fun …. ingenious creation coming right up

Image

Alex and Renato having fun with the kids…you’ve got to love the pretty bright colors of the Pico-kit 🙂

Image

Allen and Michelle working of the questions for the Quiz-biz…its gonna be fun….

Image


Image

Roy helping out the older kids with the slightly more complex Scratch project …#there’s everything for everyone..

Image

Don’t you just love how  everyone is busy with something…?

Image

Renato with her kids proudly showing the final project…

Image

A panoramic view of the kids settling down for Michelle’s and Allen’s Quiz-Biz

Image

…settle down kids…Image…and the Quiz-Biz begins…

Image

Kids showing off their cool projects…

Image

…and some more…

Image

Image

…and that marked the end of a wonderful day out with Fun-Kidz and Team Awesome filled with new stuff learnt about sicience and technology and better yet, FUN!!!

FunKidz Tech Club: Week 3

Image

This week, we changed venues to the FunKidz town office situated on Muthithi Road opp. The Nairobi Museum. We started with a series of game, mainly Simon says. This loosened up the kids for the work we had lined up for them. Right away we started the session with an introduction of Scratch, a program that allows anyone to make anything from a video to a pictorial with the littlest amount of effort.

The kids had a lot of fun letting their imagination run free on the desktop screens. After that we sat them down for ten minute clip on the Solar system (above).

We went right on and started on the picocricket Below you can see the littlest going through the basics.

Image

After the orientation, we set on for the day’s project, a theme park full with fun activities. We envisioned a merry-go-round, a Ferris wheel, trains and an assortment of light fixtures. Each child got to pick what they felt most passionate about and we helped them along.

This young boy was busy making his Ferris Wheel.


These ones were piecing together the light fixtures.

Image

The train seems to be coming along well in this one.

ImageImage

Image

Uh! The Merry-go-round looks half done. Not bad.

Image

Image


Final preparations before the theme park could be open for friend’s and family.

Image


Parents and volunteers eagerly anticipating the opening. I wonder how awesome it is.

Image

Tadaaa!

ImageImage

The children all got a chance to talk a little about their inventions which sent the parents into a series of claps and adjuration for all their hard work.

Image

Funkidz Tech Club: Week 2


This is the second week of our six week program. with the wonderful kids . The day began on a high note though it was quite chilly. We played games I sent a letter to my mother and it was so much fun watching the outreach guys being outrun by the kids.

Once the games were done we went into the house where we started making cool stuff. But before that, there was a demonstration of how to use the picco and how  to make cool stuff such as cars, trains e.t.c

Soon enough the kids got into it once they knew what each part did and boy did they get into it. One of the kids making a really cool car made out of the legos

These two are busy picking up pieces to decorate their invention. I wonder what they made.

Once they build the car of their choice, they where of to the computer station to program it to do really fun stuff..

Here’s a look at this car. Hard to believe kids can build this from scratch. Just goes to show you what can happen when you give kids a little bit of rope, they PULL..

Once the program was set, this youngster was on his merry way.

Here’s a look at another group hard at work.


WOAH!! Talk about powerful yet elagant. 

Here’s another look at what was going on this saturday.

These children upped their game this weekend and opted to build a helicopter.

And here’s a robot that one child was insistent on making. Goes to show what a little determination can get you.

Watch this space for updates on this coming weekend.